Add images on your site must be stored in the image library on your web server. Doing this will ensure that your image will always display as the connection is direct.
How to Add Images in the Content Editor
- Click on the Add Image button that is found at the top of the rich text editor.
- Drag and drop your image files from your file explorer, or click the grey box to open it in a new window.
- Select your image and confirm with the open button in the bottom right of the window.
- Add a filename and descriptive alt text.
Why is this important? - Once uploaded and saved, you will the image in the gallery. Click the image to add it to your page
- You may resize this image in the editor by selecting it and dragging the blue squares in the corners.
Watch the following video demonstration.
Using the Image Library
The Image Library stores all images used on your website, allowing you to reuse them across multiple pages while keeping your media organized and clutter-free.
Always ensure images are in the Image Library. Avoid linking to external image URLs. If an externally hosted image link is changed or removed, it will no longer display on your site.
Add an image directly to the image library:
- Navigate to the Images tab from the left-hand menu.
- Click ⨁ Upload Images in the top-right corner.
- Drag and drop your image files from your file explorer, or click the grey box to open it in a new window.
- Add a filename — no spaces or other special characters such as: \ / : * ? " < > .
- Include alt text that’s clear and descriptive. This helps users and search engines recognize the image.
- Click upload
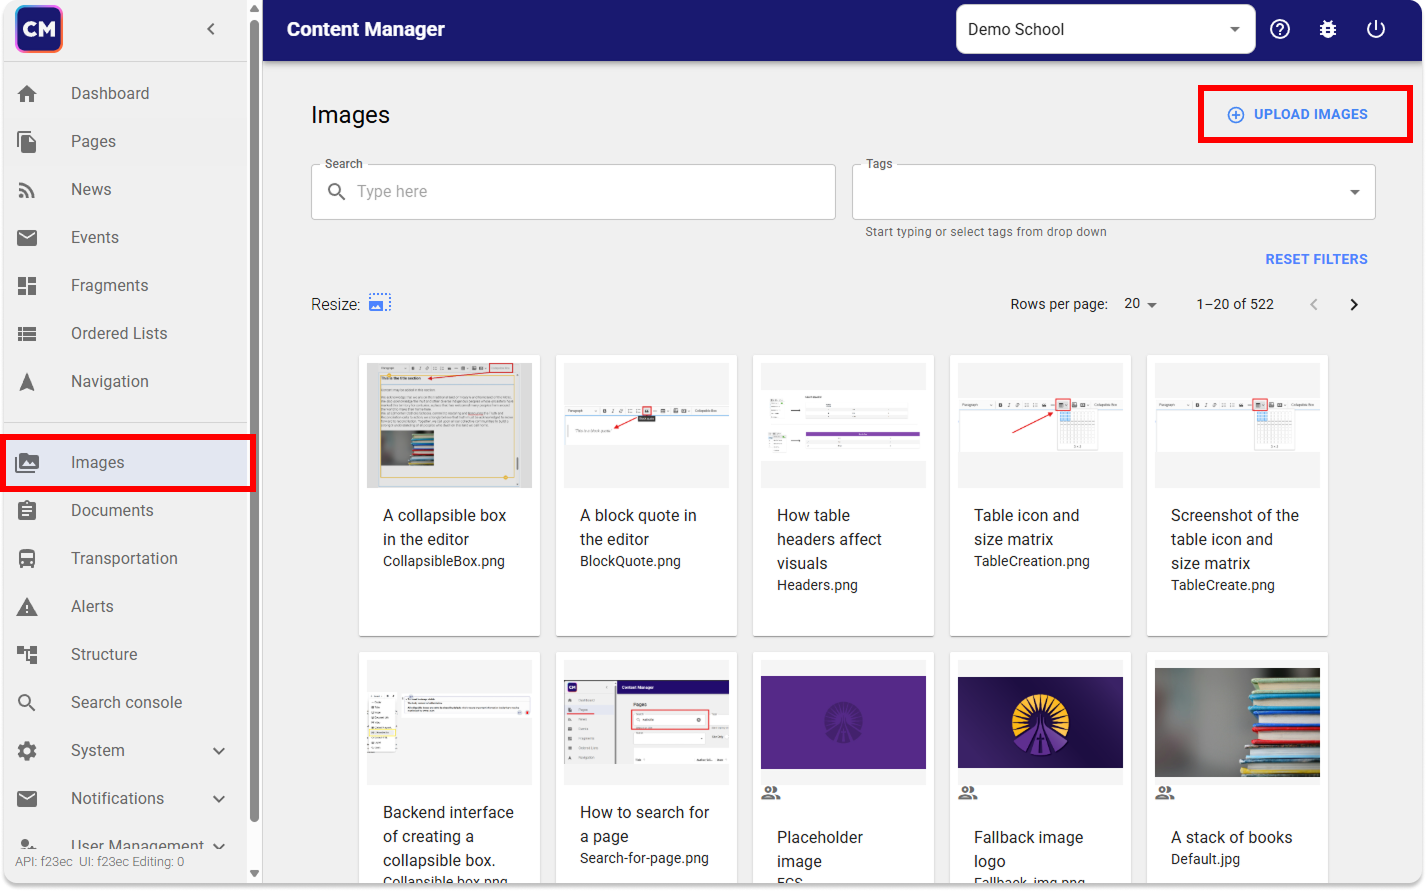
Image Best Practices
To ensure you adhere to federal legislation and division guidelines, please consider the following when using images
Stock Images
When creating school content, always use images that are properly licensed. Stock and copyright-free visuals are safe, legal, and help protect both you and the school from copyright violations.. You can access copyright-free images by:
- Searching our internal image library using the tag stock
- Using publicly available copyright free image sources:
Accessibility - Ensuring Everyone can See your Message
Web Content Accessibility Guidelines (WCAG) recommend avoiding using images that include text. Modern websites are designed to be responsive. An image will appear different on a mobile phone compared to how it might look on a large browsers screen on a desktop. When viewing an image on mobile and the words within the image would potentially be too small to read. Similarly, if images have text embedded and a translation tool is used, the image’s text won’t be translated.
Sometimes certain text such as logos or brand names are necessary, in which case use Alt Text.

Do!
We suggest that you use an image like this. These images work much better when used in the preview image section (these images are also showcase on the home page when sharing to spotlight or news posts.

Don't!
Avoid using an image with text. Don't rely only on an placing an image or graphic with text on your page. You must include all important information in the body of text on your web page for it to be accessible.
Make Images Web and Mobile Friendly
- Always export your images to have a web friendly 72 dpi. This will insure images load fast and don't slow down a site
- Keep to a standard 16:9 ratio
- Banner sizes should be 1200px X 450px
- Consider using the NEW image crops feature
New Feature!
Image Crops
You now have the ability to Crop images to pre-defined sizes, allowing you to decide which part of an image you'd like to focus on for the sizes that your district has pre-configured. These cropped images live side-by-side with the original, and allow us to show users the right thing depending on where this image is being used.
Image crop sizes are managed at the district level.